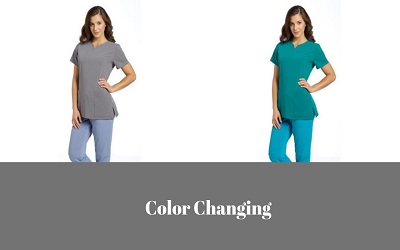
Color changing or color correction for image is one kind of color ordering process when one goes to alter or enhance the color of an image. Color ordering covers both color correction and the group of artistic color effects on image/photo. It’s a Photoshop artwork applied by highly skilled professionals.
Color correction denotes to the process where it’s about balancing out the colors, making whites that actually appear as white, and the blacks that actually appear as black, and that everything is the same you wish to see.
Primarily, Color correction work may be done across the entire image or partially, utilizing controls over the specific color of red, green, blue, gamma, shadows (blacks), highlights (whites), and of full picture. By altering the intensity of any color can be completely changed the original look of an image.
But secondary color correction is based on the idea behind Chroma keying, where color saturation, luminance and hue of only the yellows, reds, magenta, greens, cyan, blues are altered; and other all colors in the spectrum are slightly exaggerated.
As you find how to change background color in photoshop please click this.
In this process, sometimes color gradient is also applied for very little color changing work. If one wants to change color brightness for any image or its particular part then by selecting the targeted part the brightness or contrast can be adjusted according to one’s requirement. With all the creative chances getting from different image editing software; one can easily take this opportunity to do the work of color correction or color grading. Color grading system never brings the accurate result for an image but can motivate the image in looking good.
Images have been an integral part of all marketing strategies. They help in making a connection with the target audience and showcase a product or a service. This is a guide to the color correction service .Have you ever looked at your photos and thought they look good but there’s something missing? A lot of people use photo apps like Instagram or Snapchat to edit their photos before posting them online or printing them out. However, what you get online or in print is not 100% accurate. Professionals will help you get the best photos possible. Learn more about this topic by reading the blog.
Color correction services for photographers
Let’s face it, if you’re trying to sell your product or services, you can’t use the photos you take. This is a guide to color correction services. In general, the photos you get off of your camera may not look great. Color correction or retouching makes a big difference. Find out more about color correction in this blog. Determining the proper post-processing workflow nowadays, smartphones have amazing cameras that do an excellent job of capturing photos and videos, but most photographers have to work on a computer to edit the photos. This is a guide to the post-processing workflow. Although this topic is more of a generic guide to the post-processing workflow, this could be useful to post-processing professionals who work with various photo editing software.
Change color of image photoshop
Color matching is one of the toughest tasks for graphic designers and photographers alike. It is not easy for you to match the color of a photo with the color of the background. Color matching is more than simply matching shades. You need to match the overall color of the photo with the background of the room, table, text, etc. It may be difficult to match colors with objects if they’re behind a color like white or black. You might want to try this Photoshop technique. You can modify a photograph in the interface and then save the modified photo. It will then change the color of the entire photo. Use editing tool for color correction Another way to correct color is to use an editing tool. We all have used some kind of editing tool to make our photos look better, but they are complicated.
Change background of photo in photoshop
Photoshop, Adobe’s flagship image editing software has been used by professionals and everyday people. In the past, beginners would ask professionals to change the background of their photos, but now they’re able to take control of it with some simple tools. If you have a screenshot of your photo on your computer that you would like to use as your background, you can resize the image to fit it properly. You can also change its color to match your choice.
Photo color correction services
Would you like to add some color to your photographs? Would you like to add some fun to your images? It can be done without compromising on quality. Using color correction services can make your image stand out from the rest. Experts have the expertise to tweak the colors without harming the original image. With an expert photo color correction service, you can edit and enhance your photos and the colors they contain.
As it’s already said that color correction and color grading go unnoticed to the untrained eye most of the time. But, when you’ll learn in detail then you’ll understand that there are some specific differences. If we talk about color correction then it’s nothing but a singular process that involves making adjustments to an image to ‘correct’ any ‘deviations’ from its standard appearance. It comes with:
In addition, it’s used to cover mistakes that are made with camera settings as well as to pull more information from flat profiles. As it creates cohesion between shots, you should correct the color of your images whenever possible.
But, as color grading is a multi-process, it can change the visual tone of an entire image. You can work to change the thematic and aesthetic when your image is corrected. Usually, it uses as a brush to paint a picture. It comes with:
Because color grading is considered a more “high-end” process than color correction, it’s used quite often for most images. So, you should be prepared for more labor-intensive editing and longer render times if you are looking to create more detailed color profiles. And you are potentially missing a vital part of the process of finalizing your image if you aren’t applying any color grading to either your photographs or motion work. Professional color grading is a skill that can be learnt. A color grading tool will help you attain a level of accuracy to get a better output from your photos. There are three things a professional color grading service should include: Post-production – After using your smartphone or smart camera, the photos need to be upgraded and thus need a pro photo editing service. * Be realistic – Color grading should be realistic. There is no point in correcting the color of something that you don’t really want. Be realistic and don’t go too over the top. * Expertise – Color grading is an art, and it requires expertise to get the perfect results.
The Process of Color Correction Service

In the Levels or Curves adjustment, you can use the eyedroppers to correct a color cast such as an unwanted tint from an excess of color (red, green, blue, or cyan, magenta, yellow). By identifying an area that you want to be neutral and then removing the color cast from that area, it’s easier to color-balance an image. And you can use one or all three of the eyedroppers depending on the image. As Set Gray Point eyedropper doesn’t require large adjustments and has easily identified neutrals, they work best on images. But, don’t forget that while using the eyedroppers, it undoes any previous adjustment you made in Levels or Curves. That’s why it’s best to use them first and then fine-tune your adjustments with the Levels sliders or Curves points if you plan to use the eyedroppers.
You know now that color correction is the process that’s used to adjust the images you shot to get a good exposure. It’s usually done by balancing the light in the shot. But, you should note that color correction refers to work done in post-production with the images, which are already shot. If you want to adjust the color and create proper exposure while you are shooting, then there are methods that you can use. Well, let’s know how to do color correction in Photoshop with 7 simple steps.
In the first step, open an image that you think has a color cast to get started. Now, you have to follow this path: “Window” >> “Info” to display the “Info palette”. You will get information about the pixels in your image from here. And you will have RGB mode displayed in the upper left corner of the dialog if you’re working with a standard photo.
You will use the Info palette to display information about the image to make the color correction. In this case, you need to make some color sample points on the image. After that, you will do this using the “Color Sampler” tool that shares a toolbar position with the “Eyedropper”. Now, the next thing is to do from the toolbar, and follow the path: “Color Sampler tool” >> “3 x 3 Average Sample”. As you’ll want to sample a larger area than just a single pixel, this is important.
In this step, locate a place on the image that should be white or a light neutral gray in color. Selecting the “Color Sampler” tool, click on it. Then you’ll see a marker that appears on the image with the number 1 next to it. Now, you have to ensure the point you select is one that should be white or light gray. But, avoid selecting an area of the image which is blown out such as a light spot.
And repeat the process and at this moment, click on another point which should be either white or black or a neutral gray. Here you’ll get the second sample point. And if you desire then you can continue and add a total of four markers. But, keep in mind that all of them should be placed in an area of the image and that should be white, black, or a neutral gray.
OUR SERVICES AT A GLANCE:
BACKGROUND REMOVAL SERVICE
PHOTOSHOP MASKING SERVICE
PHOTO RETOUCHING SERVICE
NATURAL SHADOW SERVICE
PHOTO RESTORATION SERVICE
COLOR CORRECTION SERVICE
NECK JOINT SERVICE
VECTOR CONVERSION SERVICE
CLIPPING PATH SERVICE
Now, you have to check back in “Info palette” so that you can read the color info for every point. You should see values around 245 for the R, G, and B channels for the lightest points and the value should be around 15 for each of the channels for the darkest points. In addition, you should have equivalent values of R, G, and B for gray points. But, they just need to be roughly the same for each as they can be any value.
You’ll find that the numbers at each point are not within a range of 2 or 3 values of each other if your image has a color problem. You have to bring them closer to each other to color correct the image what you’ll do is adjust the curves for each of these channels. Now, follow this path: choose “Layer” > “New Adjustment Layer” > “Curves” and click “OK”. It will help you to correct the individual channels and from the “Channel” dropdown list select “Red” and then “Ctrl + Click” on the first point, which you marked in your image. As this adds a small marker on the curve line, it shows you where this point in the image appears on the curve.
You have to repeat the last step for all the sample points for those you created on the image. After that, you also should repeat it for the ‘Green’ and ‘Blue’ channels. So, it ends up with all the sample points containing values that are within 2 to 3 values of each other.
Finally, click “OK” to close the Curves dialog when you’re done. Moreover, in Photoshop CS3, you can now apply other fixes such as adding contrast to the image with a further curves adjustment. And you can make it easier to remove color casts by reading and adjusting numbers while using the Info palette combined with sample points on the image.
Over to you readers
Let us know whether you try our trick! Also, you can knock us for more about this concern if you are interested in learning more about Photoshop. Till then Happy Color Correcting!
We save your time so download this resources, Thanks.
Color Correction Photoshop Tutorial Only 7 Steps Slide Show
Color Correction Photoshop Tutorial Only 7 Steps Google Document
Color Correction Photoshop Tutorial Only 7 Steps Google Docs
For this task, there needs an expert hand for accuracy. Clipping USA has a dedicated team of serving color correction work for your images who work for 24 hours a day during a year. Clipping USA also offers cost-effective services for new customers. So just manage your time to contact asking for a free test of quality evaluation.

P.O BOX; 10623
12336 La Plata St, SILVER SPRING, MD. 20904
UNITED STATES.
info@clippingusa.com
+1 240 918 9262, +1 (301) 310 6411
HOUSE # 12, ROAD # 03,
SECTOR # 10, UTTARA, DHAKA-1230,
BANGLADESH.
info@clippingusa.com
+1 240 918 9262, +1 (301) 310 6411
12601 SUMMERWOOD DR,
SILVER SPRING, MD, 20904
UNITED STATES.
info@clippingusa.com
+1 240 918 9262, +1 (301) 310 6411